combo heat press machine manual
Unlock vibrant, professional-quality transfers with our easy-to-follow combo heat press machine manual! Perfect for t-shirts, mugs, & more. Download now & create!
Combo Heat Press Machine Manual: A Comprehensive Guide
Welcome! This manual details safe operation, setup, and maintenance of your versatile combo heat press, ensuring quality transfers every time.
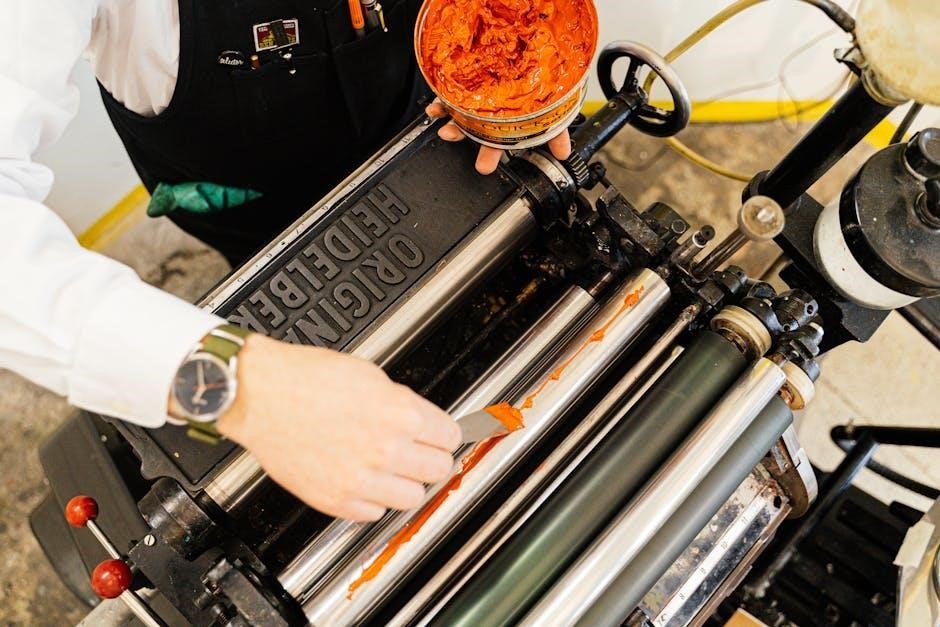
Combo heat press machines represent a significant advancement in heat transfer technology, offering unparalleled versatility for various applications. Unlike single-function presses, these machines consolidate multiple pressing capabilities – typically mug, plate, and t-shirt pressing – into a single, space-saving unit.
This consolidation streamlines production workflows, making them ideal for small businesses, hobbyists, and anyone seeking a comprehensive heat transfer solution. They are capable of applying designs to a wide array of materials, including fabrics, ceramics, and hard substrates.
Understanding the core functionalities and proper operation of a combo heat press is crucial for achieving professional-quality results and maximizing the machine’s lifespan. This manual will guide you through every aspect, from initial setup to advanced techniques.
Understanding the Components

A combo heat press machine comprises several key components working in harmony. The core structure features a robust frame providing stability during operation. Interchangeable platens – for mugs, plates, and flat surfaces – attach securely to the machine’s heating element.
The control panel is the central command center, allowing precise temperature and time adjustments. Heating pads, utilizing advanced heating technology, ensure even heat distribution across the transfer surface. A pressure adjustment knob controls the downward force applied during the transfer process.
Familiarizing yourself with each component’s function is essential for safe and effective operation. Proper understanding allows for troubleshooting and ensures optimal performance.

Platen Types & Their Uses
Combo heat presses typically include three primary platen types: mug, plate, and flat. The mug platen, a curved surface, is designed for cylindrical objects like mugs and tumblers, ensuring complete and even heat application around the circumference.
The plate platen, a flat, often smaller surface, is ideal for ceramic or metal plates, providing consistent heat for vibrant designs. The flat platen, the largest, accommodates t-shirts, fabrics, and other flat materials, offering a broad surface area for larger transfers.
Understanding each platen’s specific use maximizes transfer quality and prevents damage to both the item and the machine.
Control Panel Overview
The control panel is your central hub for operating the combo heat press. Typically, it features a digital temperature display, allowing precise heat setting control, crucial for different materials; A digital timer manages transfer duration, preventing over or under-heating.
Pressure adjustment knobs control the clamping force, vital for optimal adhesion. Many panels include start/stop buttons and alarm indicators signaling cycle completion. Some advanced models offer programmable presets for frequently used settings. Familiarize yourself with each function to ensure accurate and efficient operation.
Heat Transfer Elements (Heating Pads)
Heating pads are the core of your combo heat press, responsible for applying consistent and even heat. These elements are typically constructed with cast aluminum for rapid and uniform heating. They are strategically positioned within each platen – mug, plate, and t-shirt – to maximize contact with the transfer material.
Consistent temperature is vital; damaged or worn heating pads will cause uneven transfers. Regularly inspect for cracks or inconsistencies. Proper insulation behind the pads ensures efficient heat retention and prevents energy waste. Avoid direct contact with the heating elements during operation to prevent burns.
Safety Precautions
Prioritize safety when operating your combo heat press. These machines reach extremely high temperatures and involve electrical components, demanding careful attention. Always disconnect the power before performing maintenance or cleaning. Never leave the machine unattended during operation. Keep the work area clear of flammable materials and ensure adequate ventilation to avoid inhaling fumes from transfer materials.
Wear appropriate protective gear, including heat-resistant gloves and eye protection. Be mindful of hot surfaces and moving parts. Familiarize yourself with the emergency stop function and keep a fire extinguisher nearby. Ignoring these precautions can result in severe burns or electrical shock.
Electrical Safety Guidelines
Ensure your combo heat press is connected to a properly grounded outlet matching the voltage specified on the machine’s label. Never use extension cords or adapters unless absolutely necessary, and then only those rated for the machine’s power requirements. Regularly inspect the power cord for damage – cracks, fraying, or exposed wires – and replace it immediately if any are found.
Avoid operating the machine in damp or wet environments. Do not attempt to repair electrical components yourself; always contact a qualified technician for repairs. Disconnect the power supply before cleaning or performing any maintenance. Improper electrical connections can lead to fire hazards or electrical shock.
Burn Prevention Measures
Exercise extreme caution when operating the combo heat press, as all surfaces reach high temperatures. Always use heat-resistant gloves and protective eyewear during operation. Keep hands and body parts away from the heated platens, especially during pressing and immediately after. Never touch the machine while it is in operation or cooling down.
Be mindful of the surrounding area; ensure a clear workspace free from flammable materials. Allow sufficient cooling time before handling pressed items or attempting any maintenance. Immediately report any malfunctions that could increase burn risk. Prioritize safety to prevent serious injuries.
Ventilation Requirements
Proper ventilation is crucial when using your combo heat press, particularly during sublimation and certain HTV applications. These processes can release fumes that may cause respiratory irritation. Always operate the machine in a well-ventilated area, ideally with an exhaust fan directing fumes outdoors.
Avoid using the press in enclosed spaces with limited airflow. Consider a dedicated ventilation system for frequent or prolonged use. Regularly check and maintain ventilation equipment to ensure optimal performance. Prioritize air quality to safeguard your health and create a comfortable working environment.
Setting Up Your Combo Heat Press
Careful setup is essential for optimal performance and longevity of your combo heat press. Begin by selecting a stable, level surface capable of supporting the machine’s weight. Ensure ample space around the press for safe operation and material handling.
Before connecting to power, inspect the power cord for any damage. Proper grounding is vital for electrical safety – always use a grounded outlet. Initial calibration, detailed in the following section, will ensure accurate temperature and pressure readings. Following these steps guarantees a smooth and reliable start.
Initial Machine Placement
Selecting the right location is crucial. Place your combo heat press on a sturdy, level workbench or table, capable of handling its considerable weight. Avoid carpeting or flammable surfaces. Ensure at least two feet of clear space around all sides of the machine for comfortable access and safe operation.
Consider ventilation; avoid placing the press in enclosed spaces. Ensure easy access to a grounded electrical outlet. Double-check the surface’s stability before plugging in the machine. A well-positioned press promotes efficiency and minimizes potential hazards.
Power Connection & Grounding
Before connecting, verify your power outlet matches the machine’s voltage requirements – typically 110V or 220V. Never use an adapter. The combo heat press must be properly grounded to prevent electrical shock and ensure safe operation. Connect the provided power cord to a grounded outlet only.
Do not use extension cords if possible; if necessary, use a heavy-duty extension cord rated for the machine’s amperage. Regularly inspect the power cord for damage. A faulty cord should be replaced immediately by a qualified technician. Improper grounding voids the warranty and poses a serious safety risk.
First-Time Calibration
Initial calibration ensures accurate temperature and pressure readings. Begin by powering on the machine without any materials on the platens. Allow it to heat up to the maximum temperature setting. Use a separate, calibrated thermometer to verify the platen temperature matches the display. Adjust the temperature settings if necessary, following the machine’s control panel instructions.
Next, test the pressure settings. Apply moderate pressure and check for even distribution across the platen surface. Adjust the pressure knob until consistent pressure is achieved. Repeat these steps a few times to confirm stability and accuracy before commencing actual transfers.
Transfer Methods & Materials
This section explores various transfer techniques compatible with your combo heat press. Successful application hinges on selecting the correct materials and settings for each method. We’ll cover sublimation, ideal for vibrant, all-over prints on polyester fabrics and coated substrates. Heat Transfer Vinyl (HTV) offers durability and customization for apparel.
Furthermore, we’ll detail Direct-to-Film (DTF) transfers, known for their high detail and suitability for a wide range of fabrics. Understanding material compatibility – polyester, cotton, ceramics, and more – is crucial for optimal results. Always refer to material manufacturer guidelines.
Sublimation Printing – A Detailed Look
Sublimation utilizes special inks that transform into a gas when heated, bonding with polyester fibers at a molecular level. This results in incredibly durable, wash-resistant prints. Use sublimation paper designed for this process, and ensure your design is mirrored before printing.
Optimal temperature settings typically range from 380-400°F (193-204°C) with a dwell time of 45-60 seconds, but always test. Pressure should be medium to firm. Sublimation works best on light-colored polyester fabrics and items coated with a polymer layer, like mugs and phone cases.
Heat Transfer Vinyl (HTV) Application
Heat Transfer Vinyl (HTV) offers vibrant, customizable designs on a wide range of fabrics. First, mirror your design before cutting with a vinyl cutter. Weed away the excess vinyl, leaving only your desired image on the carrier sheet. Place the HTV onto your garment with the carrier sheet facing up.
Temperature settings generally fall between 300-320°F (149-160°C) for 10-20 seconds, using medium pressure. Ensure a Teflon sheet protects both the vinyl and the platen. After cooling, carefully peel the carrier sheet – hot or cold peel depends on the vinyl type.
Direct-to-Film (DTF) Transfers
Direct-to-Film (DTF) transfers provide exceptional detail and durability on various fabrics, even dark materials. DTF designs are printed onto a special film and then powdered with adhesive. Position the film adhesive-side down onto your garment.
Temperature settings typically range from 320-330°F (160-166°C) for 15-25 seconds, utilizing medium to firm pressure. A Teflon sheet is crucial to prevent sticking. After pressing and cooling, gently peel the film, revealing the vibrant, adhered design. DTF offers excellent washability and a soft hand feel.
Operating Instructions: Mug Press

The mug press attachment transforms your combo machine into a personalized drinkware creator! Ensure the mug is clean and dry before applying your sublimation or transfer design, wrapped securely with heat-resistant tape.
Adjust the mug press element to snugly fit your mug size. Typical settings are 360-400°F (182-204°C) for 120-180 seconds, depending on the mug coating and design complexity. Allow the mug to cool completely before removing the transfer paper. Handle with care, as the mug will be hot!
Mug Preparation & Design Placement
Begin with a thoroughly cleaned, lint-free mug. Any residue will compromise adhesion. Wrap your printed design tightly around the mug, ensuring complete and even coverage. Secure the design with heat-resistant tape – crucial to prevent shifting during pressing. Overlap the tape slightly for a seamless finish.
Position the mug securely within the mug press element, ensuring even contact. Avoid wrinkles or bubbles in the design. A snug fit is vital for consistent heat distribution. Double-check alignment before initiating the press cycle; a misaligned design is difficult to correct!
Temperature & Time Settings for Mugs
Optimal temperature for most standard ceramic mugs is between 360°F (182°C) and 410°F (210°C). Pressing time typically ranges from 180 to 240 seconds, depending on the mug type and ink used. Darker mugs may require slightly longer times.
Always consult your sublimation paper and ink manufacturer’s recommendations for precise settings. Start with a test press on an inexpensive mug to dial in the perfect combination. Insufficient time results in faded images, while excessive time can cause scorching or ghosting. Record your successful settings for future use!
Troubleshooting Common Mug Press Issues
Faded Images: Increase pressing time or temperature slightly. Ensure adequate pressure is applied. Ghosting/Blurring: Reduce temperature and/or pressing time. Verify the mug is securely fitted in the element. Uneven Heating: Check the heating element for damage or inconsistencies. Rotate the mug during pressing.
Mug Slipping: Use heat-resistant tape to secure the transfer. Ensure the mug surface is clean and dry. Element Failure: Contact customer support for replacement. Always prioritize safety and disconnect power before inspecting the machine.
Operating Instructions: Plate Press
Plate Preparation & Design Application: Ensure the plate surface is smooth and free of debris. Apply your design using sublimation paper and heat-resistant tape, ensuring a snug fit. Pressure Adjustment: Adjust the pressure knob to medium-high for ceramic and lower for coated materials.
Temperature & Time Settings: For sublimation, set the temperature to 380-400°F (193-204°C) and time to 60-120 seconds. For coated plates, reduce time to 45-60 seconds. Post-Pressing: Carefully remove the plate and allow it to cool completely before handling. Always use heat-resistant gloves!
Plate Preparation & Design Application
Surface Cleaning: Begin by thoroughly cleaning the plate surface with a lint-free cloth to remove any dust, oils, or residue. A clean surface ensures optimal adhesion of your transfer. Design Mirroring: Remember to mirror your design before printing onto sublimation paper, as it will be transferred in reverse. Secure Attachment: Carefully position the mirrored design onto the plate, using heat-resistant tape to firmly secure it. Ensure complete contact between the design and the plate surface.
Tape Quality: Utilize high-quality heat-resistant tape to prevent lifting or shifting during the pressing process. Alignment: Double-check the design alignment before proceeding to avoid errors.
Temperature & Time Settings for Plates
Ceramic Plates: For standard ceramic plates, a temperature range of 360-400°F (182-204°C) and a pressing time of 60-120 seconds are generally recommended. Adjust based on the plate’s material and coating. Porcelain Plates: Porcelain often requires slightly higher temperatures, around 380-420°F (193-216°C), with the same 60-120 second duration. Testing is Key: Always perform a test press on a similar plate to dial in the optimal settings.
Pressure: Medium to firm pressure is ideal. Time Adjustment: Longer times are for darker surfaces.
Operating Instructions: T-Shirt Press
Garment Preparation: Pre-press the garment for 5-10 seconds to remove wrinkles and moisture. This ensures optimal adhesion. Design Placement: Position your transfer design accurately on the fabric. Use heat-resistant tape to secure it if needed. Platen Adjustment: Adjust the pressure knob to a medium-firm setting for most fabrics. Thicker materials may require increased pressure.
Pressing: Close the press firmly and begin timing. Cool Peel vs. Hot Peel: Follow the transfer paper’s instructions for peel temperature.
Garment Preparation & Platen Adjustment
Pre-Pressing: Always pre-press garments for 3-5 seconds to eliminate moisture and wrinkles, creating a smooth surface for optimal transfer adhesion. This step is crucial for vibrant, lasting results. Lint Removal: Use a lint roller to remove any fibers or debris from the fabric surface.
Platen Adjustment: Adjust the pressure knob based on fabric thickness. Light fabrics need lower pressure; heavier fabrics require higher pressure. Begin with a medium setting and adjust as needed. Ensure even pressure distribution across the platen.
Temperature, Pressure & Time Settings for Fabrics
Polyester (Sublimation): 380-400°F (193-204°C), medium pressure, 45-60 seconds. Cotton (HTV): 305-320°F (152-160°C), firm pressure, 15-20 seconds. Blends (Poly/Cotton): 320-335°F (160-168°C), firm pressure, 20-25 seconds.
Pressure Adjustment: Always test a small, inconspicuous area first. Increase time or pressure if the transfer doesn’t fully adhere. Reduce if scorching occurs. Time Considerations: Thicker fabrics may require slightly longer pressing times. Always refer to your transfer material’s specific instructions.
Maintenance & Cleaning
Regular maintenance extends your machine’s lifespan and ensures optimal performance. Daily cleaning involves wiping down the platens with a damp, lint-free cloth after each use, removing any residual transfer material.
Weekly checks include inspecting the Teflon sheets for wear and tear, and ensuring all screws are tightened. Monthly, examine the heating elements for even heat distribution. Avoid abrasive cleaners, as they can damage the surface. Proper care prevents malfunctions and maintains transfer quality.
Daily Cleaning Procedures
After each use, and always when the machine has cooled down, disconnect the power. Use a soft, damp (not wet!) lint-free cloth to wipe down all platen surfaces – mug, plate, and t-shirt. This removes adhesive residue and prevents build-up.
Inspect the Teflon sheets; replace if damaged. Gently brush away any loose particles from the machine’s base. Never use abrasive cleaners or solvents, as these can harm the non-stick coating. A clean machine ensures consistent, high-quality transfers and prolongs its operational life.
Periodic Maintenance Checks
Every month, or after 500 presses, inspect the power cord for any signs of damage – fraying or exposed wires. Check the control panel buttons for responsiveness and ensure the digital display is functioning correctly. Verify the pressure adjustment knob turns smoothly.
Examine the heating elements for even heat distribution (use a heat-sensitive tape). Crucially, confirm the grounding connection is secure. A qualified technician should handle any internal component checks. Regular maintenance prevents breakdowns and ensures consistent performance.
Troubleshooting Common Errors & Solutions
Error Code E1: Indicates a temperature sensor failure – contact support. E2: Suggests a heating element malfunction; do not operate. Uneven heating: Check for obstructions or a failing heating pad. Pressure issues: Adjust the pressure knob or inspect for worn components.
Transfer failures: Verify correct temperature, time, and pressure settings for the material. Machine won’t power on: Check the power cord, outlet, and circuit breaker. Always disconnect power before attempting repairs. If issues persist, consult a qualified technician.
Advanced Techniques & Tips
For full coverage, utilize a larger platen and ensure even pressure distribution across the entire design area. To prevent ghosting, use high-quality transfer paper and appropriate pressure settings. Bleeding can be minimized by using a Teflon sheet and precise temperature control.
Optimizing pressure is crucial; lighter fabrics require less pressure than thicker materials. Experiment with dwell times to achieve optimal adhesion. Pre-pressing garments removes moisture for better results. Regularly calibrate your machine for consistent performance and professional-quality transfers.
Achieving Full Coverage Transfers
Successful full coverage demands a platen size matching your design dimensions. Ensure even pressure across the entire surface; inconsistent pressure leads to patchy results. Use a high-quality, full-coverage transfer paper designed for your chosen material. Slightly increase the temperature and dwell time, but monitor closely to avoid scorching.
Pre-press the garment to remove wrinkles and moisture, creating a smoother surface. Apply firm, consistent pressure throughout the entire transfer process. Consider using a Teflon sheet to protect both the garment and the platen. Inspect the final product carefully for any areas needing re-pressing.
Preventing Ghosting & Bleeding
Ghosting, a faint outline of the design, often results from insufficient heat or pressure. Increase both slightly and ensure proper platen contact. Bleeding, where colors run, is typically caused by excessive heat or pressure, or low-quality transfer paper. Reduce these factors and use a higher-grade paper.
Proper weeding of heat transfer vinyl (HTV) is crucial; stray pieces cause unwanted marks. Use a Teflon sheet or parchment paper to prevent ink migration. Ensure correct temperature settings for your material; overheating exacerbates bleeding. Test on scrap fabric first to dial in optimal settings.
Optimizing Pressure for Different Materials

Pressure is key to successful heat transfers, but varies significantly by material; Polyester fabrics generally require medium to high pressure for sublimation. Cotton, with HTV, often needs high pressure for firm adhesion. Delicate fabrics like silk or rayon demand low pressure to avoid scorching or damage.
Ceramic mugs need moderate, even pressure for consistent image wrap. Plates require less pressure than garments. Always start with lower pressure and incrementally increase it, observing the transfer quality. Too little pressure results in a weak bond; too much can distort the material.